Virtual Car Assembly Procedure
- Designate someone to build the spring while the rest of the group builds the car.
- Print the RP templates on a laser printer (if not already done)
- Glue the RP templates to construction board
- Cut out the RP layers with a knife (don't forget axle holes)
- Join each RP layer in sequence. Here is the recommended way:
- Poke pins through registration dots of layer #1, and remove
- Poke pins through registration dots of layer #2, and keep them inserted.
- Go back to layer #1 and put glue on it.
- Join layers and press together, matching the pinholes
- Remove pins and repeat for each additional layer.
- IMPORTANT:
- Construct in sequence. Don't flip pieces over!
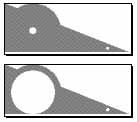
- Leave middle layer unglued, for access to the spring (like the picture above)
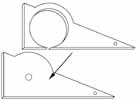
- Insert spring bar (straightened paper clip inserted through registration holes
at top of chamber)
- Insert spring hanger (paper clip suspended from spring bar)
- Cut front axle (body width + 3 inches)
- Cut rear axle (same length)
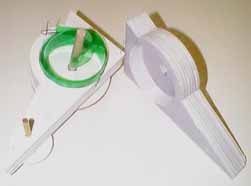
- Attach one end of spring to paper clip
- Staple other end of spring to arbor (rear axle)
- Install front axle and wheels (method of wheel attachment is up to you)
- Install rear axle and wheels (think about how the spring has to be wound)
- Join halves with spring bar
- Wind up and go!